Friday, May 30, 2014

Birthday gift for P made by k!

Last few terracotta projects have been birthday gifts!

This time - close friend wanted to make jewelry for his wife's bday gift!
She is into terracotta jewelry and anything rustic ethnic indian... and so K wanted sit with me for some jewelry making sessions!

After S he is the first boy I have made jewelry with and he surprisingly "gets it!" :) The boys do get it! Now S has appointed himself as my design critic! And he does not hesitate one bit, to tell me when the design is not up to the mark!

K managed to free up 2 evenings and we sat and baked up couple pendants  :)
Here is how they look...

This green one is totally K's design and he came up with it just like that after a 15 minutes of playing with the clay! Everyone has hidden talents! Such a pleasure when you uncover them!


And the second pendant is a sun inspired pendant... Liked the blue and gold in combination (as usual)


I am waiting to see his wife's reaction when he tells her that these are handmade by him!


Another closer lok at the pendants :)


Happy bday P! you have a very thoughtful loving and a creative hubby! :)

Added these jhumkas to match with the green pendant.. :)

Thursday, April 17, 2014

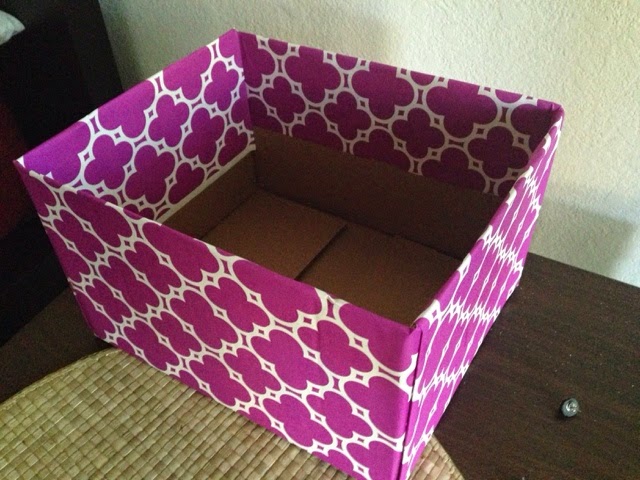
DIY bin

I KRP, hereby proclaim my love and obsession with Moroccan patterns and designs.

I picked up this lovely wrapping paper in home depot a few days ago and finally my project, to up cycle a diaper box to a toys bin, saw the light of day :)


Pinned the instructions to make this, roughly a year ago and now I finally came around to making it.

Here are the instructions if you are interested.
http://lizziemerin.blogspot.com/2011/11/fabric-covered-boxes.html

This blogger has used spray glue and fabric. I replace them with mod podge and thick wrapping paper.


The insides are not greatly attractive. So far they are covered up by the contents and do not look bad.
But the truth is that I haven't gotten around to modpodging the insides with a simple white paper to complete the project. :)


When I do finish this I will make sure, at least, I update this blog on time :)
Oh the wonderful timings of the toddler time zone!

Happy bday Jates.

April is so full of birthdays for us!!

This time my oldest closest friend was with us to celebrate her birthday!

I have know Jates for more than half of my life! She is just one of those people who I never lose touch with. We would not have spoken for months at a stretch - owing to time zone differences and other life's events. But still when we catch up, it is like nothing has changed! She is just the same her and I am just the same me.
You know how you are always in touch with some people! :)
Wow I can be pretty bad at expressing certain emotions eh? ;)

We managed to put together a small party for her. Being a weekday, things barely came together, but you know there is definitely some charm to ad hoc unplanned celebrations.


Since she was with us for a week - I decided that we would hand make her gift and have her customize it the way she wants. And what's better than custom terracotta jewelry!!

Here we are sitting up late into the night, baking, molding, painting and clicking pictures. :)


All supplies spread out.


We ended up creating this pendant for her. It is a double colored pendant with blue on the flip side.


We also made couple studs for her. All in the aroma of a Moroccan spice candle! Girls night out :)


Happy bday JT! Love you!

Happy bday S

17 Apr 2014.
Today is Dearest S's bday!

As usual he wants it to be kept so simple! What do you want? ummmm Nothing... Where do you want to go.... ummm its a weekday... What do you want to do... Regular things....

Somehow, its so hard to get him excited about birthdays! "It is just another day - Yes I was born this day.. But yea everyone was born someday" is what he says!
Just one of those things which I will never understand!

So as usual - after taking his inputs I just go about making the day the way I want it! :)
This year I decided to make him a tiramisu! It is one of his favorite desserts - its almost at the very top - with may be a couple other contenders like tarittipal and creme brulee...

I am so surprised as to how simple it is to make this sinfully awesome dessert! I did not even turn on my Oven! Wow!
But yes I ended up investing in a handmixer - but I am sure I will be trying out a whole variety of dishes just because I now own a hand mixer. Many more recipes are now so doable!

 Here is the picture of all the tiramisu bowls just assembled...


If I may say so myself, they looked good :)


All wrapped and placed in the refrigerator to set for the big day!


I ended up assembling them a day ahead - so they can set and soak well for the next day..


D gets his own milk version of the tiramisu - we call it the milk misu :)
It is just lady fingers dipped in Milk and topped with vanilla flavored whipped cream


Happy birthday dear S! It so lovely leading a life with you :)


There is small D waiting for his appa to blow the candles.
He wanted to gobble his milk misu all in one go! 


Oh and a surprise was what google did to S's home page.
When he signed in and went to google's home page, they had a custom page for him with cakes and candles. And when the mouse hovers on the google image - there was a badge wishing S happy bday!
Nice surprise, but pretty nosey of google  :P


Friday, February 28, 2014

Tray

On this cold rainy day I have 2 things to be excited about. The hot mug of spiced tea that I am drinking and my latest DIY tray :)

The rough idea is to laminate fabric and stick the fabric to the base of the tray. Laminate makes it easy to clean. Just wipe :)

The finished tray can be used to serve tea (:D) when you have guests or can simply be used in your living room to hold a collection of miscellaneous objects.


This idea has been on pinterest for ever and I took instructions for this blog and this blog. Laminating the fabric is an improvisation thought of by yours truly :)

I started off by picking up a 14"x11" tray from Micheal's. It was unfinished wood so I painted it with an off white paint. (Of course had to be white! I am officially obsessed with white now!)


One thing I did differently this time while painting was not to use spray paint. I have always used spray paint in the past with my projects. I think one might end up using lesser paint if you paint by brush (or a roller) instead of spray. I am yet collect solid evidence for this, so don't quote me :)


Once the paint is all dry, its time for the next step - Fabric. Choose your favorite fabric. I am also borderline obsessed with Moroccan patterns. This was my choice.


You will also need heat on Vinyl laminate.


Cut your fabric to the inner dimensions of the bottom of your tray and adhere the Vinyl to your fabric following the instructions on the laminate - I just had to iron on the vinyl for about 10 seconds.

Fabric on the left is without Vinyl laminate and the one on the right is with. You can see how the fabric can appear a little dull once laminated.


You can see the laminated finish in the picture below.


Your tray is now ready to receive a pop of color.


I used elmer's spray adhesive to attach the fabric - This can get a little messy. While gluing, I wanted to re position the fabric on the corner so I had to peel it out, it was not a clean peel to say the least. The I ended up over spaying in a one spot. It was challenging. Anyways I somehow managed to position the fabric and my fingers were all glue covered and sticky for the next hour. Use gloves - Definitely can save some annoyance.


Anyways - this is how my tray ended up looking. What do you think of it?


Linking it to made by you mondays

Monday, February 10, 2014

Yellow green jhumkis

I am now reading this book called - I am a stranger here myself. Written by Bill Bryson, it is a pretty funny book.
The author has moved back to the United States after about 2 decades in the UK. He wrote these as small funny anecdotes about day to day things in a UK newspaper. This book is the collection of all those articles.
Each article is like a short story, just the right quantity for me - to read a couple of them at night before bed time. A few giggles before I retire for the day :)

Now that the book review is out of the way, I now present to you my latest Jhumki.
Got a chance with terracotta jewelry making after a month almost! Life has a way of getting so busy.


Bought a new mustard color - craftsmart.


I think the color itself is nice, but the finish is not as smooth as the metallic colors.


Will try a glaze finish on top to see if it shines better.


Anyyways... here is me selfie - trying out the latest Jhumki.


Thursday, January 9, 2014

Small jhumkis - 2

After we made and wore the first set of small jhumki's we were very excited to say the least!
Lil Sister and me sat down the very next evening late into the night thinking up and trying new designs and patterns and color combinations.
Eventually the long long day we had started showing and our creativity decided to go to bed!
But we ourselves just refused to go to bed! Considering we had very very little time left before she would return back to India, we decided to make whatever that could end up pretty looking :)

We made a lot more small jhumkis. This time we got out of the comfort zone of blue/green/gold and used various colors.

I liked the cranberry color so much. Especially that its not metallic. I was skeptical to start with, but after a couple coats it was beautiful :)


So we used a lot more cranberry and of course there had to be gold!


One more experiment we did this time around, is to attach earring posts instead of french wire danglings.


More jhumkis with pretty much the same molds.


This stud below is M's experiment. They turned out cute! We were thinking of painting cranberry where ever it is black now. But that's still not decided - what would you say?


Here is the entire collection we made that evening.


Our favorite display case :)


Here's my verdict:
One of the best things in life is a night out with your sister making colorful jewelry :)


Love you M!